About The Author

Hello! From Chuchura (in Hooghly District) and a foodie, I created this blog with a mission to preserve the food of the land; with a message to encourage and promote clean and real food. I hope you enjoy and gain out of this blog, happy reading!
Looking forward to read and hear your feedback.
Sounds Indo-Chinese, however an Indian innovation or rather an Indian jugaad – welcome to the world of chilli idli!
We all know how vast and versatile South Indian cuisine is.
A lot of the South Indian dishes are rice-based starting from idlis, dosas, uttapam, etc.
However, idli is the staple.
Making Idli is pretty straightforward and easy, if you happen to know the basics of preparing the idli batter (and I have covered it here).
Paired with coconut chutney and sambar, this light south Indian snack captivates children and adults alike.
Budget Idli makers make it even more convenient for Indian households to make this low calorie healthy snack at home for breakfast or as a tea-time companion.
What do you do with left-overs idli though? Whip up chilli idli in few minutes and make it a finger-licking good and hearty snacks!
Chilli idli is an Indo-Chinese adaptation of the standard, plain idli.
Leftover idlis are converted into a delicious treat known as chilli fried idli or just chilli idli.
This is a popular snacks item across major parts of India, where leftover idlis are cut into small pieces and fried with sauces, condiments and spices to give them a unique and delicious touch.
In this article, I have covered the basics – starting from the measurement of the batter to how to ferment the batter to finally steaming an idli and cooking a great chilli idli recipe for all from leftover idli.
Getting the Basics Right – The Art of Preparing the Idli Batter for Delicious Chilli Idli
If you are preparing any idli recipe, the preparation must start a day before. This is where you will start the process of making the batter.
Idli batter is made with a mixture of rice, urad dal, fenugreek seeds, and flat-beaten rice.
The mixture of rice, urad dal, fenugreek seeds, and flat-beaten rice is first soaked before being blended into a paste.
The paste, also referred to as batter, must then undergo fermentation. Fermentation requires patience as the natural bacteria must get time to do its magic.
The batter is prepared a day in advance because of this. Because of the weather, it can sometimes take even longer before the batter properly ferments.
You won’t be able to produce a great idli if the batter isn’t properly fermented.
Ingredients Required To Make Idli Batter
You need just need 4 ingredients in order to prepare a good batter for your chilli idli
- Urad dal (Split Black Lentils)
Urad dal serves a variety of functions and has a powerful flavor. Protein, lipids, and carbs are among the nutrients it offers.
It promotes healthy digestion and discourages constipation.
It is also used in the preparation of dishes like dosa and papad after being ground into flour or paste.
- Parboiled rice(ukda rice)
Rice that has been refined during the harvesting process is known as parboiled rice, commonly referred to as converted rice.
It is accomplished in three steps: soaking, steaming, and drying.
Along with the reduction of starch, parboiled rice has clear grains that are less sticky.
- Flattended Rice (Chire/Chuda/Poha/Chiwda)
These white, bland-tasting grains are stiff and tend to grow up to twice their original size after being soaked in water.
It is regarded as one of the delicious, practical, and cost-effective options for meeting your daily nutritional needs because it is low in sodium, cholesterol, and saturated fat.
It is used to prepare foods like poha and idli.
- Lastly, add salt to taste.
Just the ingredients is less than half the battle won. The ratio of the ingredients used is an important aspect of to preparing a good idli batter.
Ratio Of Ingredients To Be Used
For the perfect soft idli, the dal-to-rice ratio is crucial.
Stick to the 1:3 ratio for dal and rice, whether you prepare it with idli rice or idly rava.
Many restaurants favor a 1:4 ratio.
However to the best of my knowledge, a 1:3 ratio produces ideal results.
This indicates that 3 cups of rice or idli rava should be used for every 1 cup of urad dal.
How To Make Idli Batter for Chilli Idli
Making the idli batter for your chilli idli is a 3-step process. For ingredients and portion, please refer to the recipe.
Washing and soaking urad dal
Take urad dal. Rinse it in a bowl three to four times or until the water is clear. Fully drain the water.
To the urad dal, add the fenugreek seeds (methi) and water. Let the mixture soak for at least 6 to 8 hours or overnight.
Grinding Urad Dal Mixture
You can use any of the following two methods to grind the urad dal.
Using a Wet Grinder
After soaking, completely drain the water.
Add the soaked dal (and fenugreek) combo to a wet grinder and add ice-cold water. It’s essential to utilize ice-cold, chilled water when using a blender to ground soaked urad dal.
Make a light, frothy batter by grinding the urad dal. This requires around 20 minutes. A quarter cup of water should be added every five minutes.
Transfer this batter to a container, large enough to give it space to rise.
Adding a couple of ice cubes would be ideal, because a blender instantly warms the dal while fast grinding it.
You are also more likely to create denser and flatter idlis if the batter heats up as it is being ground.
To keep the batter cool, it is especially crucial to add the water for blending in small amounts rather than all at once in this case.
Using the Blender
Blend the soaked urad dal and methi seeds in a blender with just enough water to make the dal into a smooth paste. The time needed for this should be brief.
To check if the batter is of the right consistency, take a pinch of the batter and drop it on water. If the batter floats, the consistency is correct.
Prepare the Idli Rice or Idli Rava Batter
Soak the poha for 10 minutes.
Wash the rice properly and allow it to soak in enough water overnight or at least 6-8 hours.
Drain the water and add the poha and rice to the blender or wet grinder and add ice cold water to it.
If you are using idli rava, please ensure that you squeeze out the entire water before adding to the blender or grinder.
Grind or blend to a coarse paste.
Transfer this idli rice or idli rava batter to the bowl containing the urad dal batter.
Add salt and use your hand to mix the batter properly. This would take only a couple of minutes, just enough to incorporate air to it and initiate the process of fermentation.
The batter consistency should not be too thick or too thin.
Idli batter is now ready for fermentation.
Fermenting the Idli Batter for Chilli Idli
Carbohydrates, such as starch and sugar, are naturally transformed into alcohol or acids through the process of fermentation, which is carried out by yeast and bacteria.
The batter doubles in size, gets thicker and fluffier during fermentation, becoming lighter while increasing in volume.
The bacteria or yeast necessary for fermentation are destroyed when you steam this batter for idlis, giving you soft idlis as a result.

Fermenting Idli Batter Naturally for Chilli Idli
Temperature is one of the most crucial elements in the fermentation of idli batter.
The idlis will be softer and fluffier if you ferment them at the right temperature and duration.
Wrapping a blanket around the container and placing it somewhere warm can encourage the bacteria to start fermenting the batter naturally.
Fermenting In Instant Pot
Making the fluffiest South Indian idli in an instant pot is the simplest method.
The fermentation process is sped up and it gives excellent results.
Transfer the prepared batter to the instant pot to start the batter’s fermentation process.
Use yogurt mode and start a 12-hour timer.
Let the batter ferment in the instant pot with a glass lid on. Transfer the batter to another airtight container after 12 hours of fermentation.
You now have Idli batter that can stay in the fridge for up to a week.
Fermenting In Oven
Place the container in the oven for two to three hours with the light on.
It is not necessary for the oven light to be on continuously, you may put off the light after 3 hours.
After being on for three hours, it produces a warm environment that is sufficient for the batter to ferment.
Tips For Making the Perfect Idli Batter
- Make sure that the batter doesn’t get heated up while grinding to a paste
- Fermenting the batter overnight naturally can give you better results
- The steaming period lasts between 12 and 15 minutes. Never over-steam idli since they will become thick and dry
- If you live in a hot climate, salt should be added after fermentation right before cooking idli
- Idli made with watery batter won’t rise and will be hard and flat. So make sure that the batter is not runny
- Give the batter some room to expand while it ferments. Do not overfill
How To Prepare Idli In Pressure Cooker
The toughest part is taken care of since your batter is prepared and fermented; all ready to be put into mold and steamed.
Set Up The Molds
To prevent the idlis from sticking, lightly grease the idli molds using oil or ghee. \
If you’ve cooked idlis before and are comfortable with your technique, you can omit the oil and use a moist muslin towel in its place.
The fabric creates a barrier between the batter and the mold, preventing the batter from sticking to it.
Set Up The Pressure Cooker
Set the stand in the pressure cooker, then sequentially place the molds on it.
Make sure the whistle is not on. Cover the pressure cooker with its lid. Turn up the stove’s heat to medium-high.
Steam will begin to emerge from the cooker. The cooking time for the idlis should be between 10 and 12.
Pour Batter In Molds And Steam The Idlis
Pour a small bit of batter into each mold using a spoon. To give the batter room to rise, fill the mold to roughly 70% of its capacity.
Do not overfill the molds since the batter will rise if you do and spill creating a mess.
Steam the idlis for 10 to 12 minutes.
Turn off the heat and give the cooker five to ten minutes to cool.
Use a butter knife to carefully scoop the idlis out of the molds. If the knife is clinging to the idlis, dampen it a little.
Now that the idlis are ready, you can cool them in the refrigerator for an hour.
All ready to cook chilli idli? Let’s dive in!
Note
The equipment & ingredient quantity provided in this recipe is to assist you in cooking this dish. Feel free to experiment with your ingredients. Remember that we all have different set, size & shape of kitchen tools in our pantry.
Equipment
- 1 Idli mold
- 1 Wok and ladle
- 1 Knife and chopping board
- Preparation and serving bowls
- 1 Wet grinder or Blender
Ingredients
To Prepare the Idli
- 0.5 cup urad dal
- 1.5 cup idli rice
- 2 tsp flattened rice
- 0.5 tsp fenugreek seeds or methi
- 1 tsp salt
- 1.5 cup ice cold water
To Prepare the Chilli Idli
- 3 tsp coconut or ground nut oil or any oil as per your choice
- 2 pc onion
- 2 pc small capscicum or half medium sized capsicum
- 6 pc green chili
- 1 inch ginger
- 12 pc garlic cloves
- 1 tsp black pepper powder
- salt to taste
- 2 tsp red chili sauce
- 6 tsp tomato ketchup
- 2 tsp soya sauce
- 2 tsp vinegar
- salt as per taste
Instructions
Prepare for the Idli (Check Detailed Instruction in Blog, Below are Just Outline)
- Wash and soak the urad dal, idli rice and poha separately in water for approx 6 hours
- Drain the water from urad dal, rice, and poha
- To the urad dal add fenugreek seeds. Grind to from a batter (check detailed guide above). Use ice cold water to form the required consistency
- To the idli rice, add poha and prepare a batter using the wet grinder or blender
- Add the rice batter to the urad batter and give it a nice whisk using a spatula or hand. This helps to incorporate air making your idlis fluffy
- Ferment the batter for at least 6 to 7 hours
- In the pressure cooker, bring water to a boil
- Meanwhile, oil the idli pan. Fill the mold with the batter
- Keep the molds inside the pressure cooker on a stand (preferably)
- Steam for 10 to 12 minutes
- Carefully insert a knife or bamboo skewer to check if your idlis are done. If the skewer or knife do not come out clean, allow it to steam for another couple minutes until done
- Slide a spoon or butter knife through the idlis after dipping them in water. Take the idlis out and put them in a container
- Your idlis are ready. Cool and refrigerate for at least an hour
Preparation for the Chilli Idli
- Cut the onions and bell pepper (or capsicum) into cubes
- Finely chop the ginger, garlic, and green chillies
- Take out the chilled idlis and break/cut each idli into four. Keep aside
- In a bowl prepare corn slurry by stirring in corn flour in water
- In another bowl, prepare a sauce mix of tomato ketchup, chili sauce, soya sauce and vinegar. Stir and keep aside
Cooking the Chilli Idli
- Take a wok, switch on the flame and allow it to heat up
- Add oil and once the oil starts smoking, add in the garlic and ginger
- When the garlic browns, add in the onion cubes and capsicum and saute for a couple of minutes on high heat
- Add in the sauce mix prepared above and allow to cook for a couple of minutes
- As the sauce comes to a boil, add black pepper powder
- Now pour in the corn slurry and allow the sauce to thicken
- Check for seasonings, adjust if required
- Now drop in the pieces of idli and mix everything in the wok uniformly
- Feel free to garnish using coriander leaves or spring onions (not listed in the ingredients since this is optional)
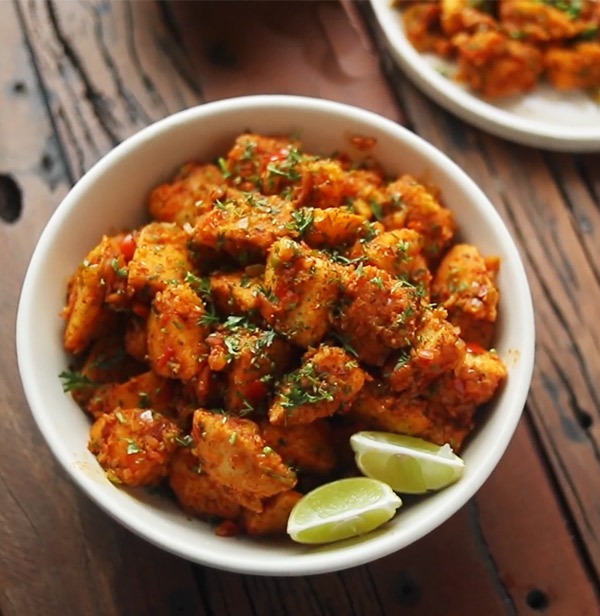
- Your chilli idli is ready to serve
Notes
- Never use fresh idli for cooking chilli idli. Use leftover or chilled idlis
- While adding salt to your chilli idli, always taste before adding. Since soya sauce contains salt, your chilli idli may not need additional salt
- When sauteing the ginger, garlic, onion and capsicum ensure that the heat in the wok is high. This will ensure that the veggies will remain crispy and not get limp because of overcooking
- To suit your taste-buds, feel free to alter the portion of the sauces used
- Idli can be stir-fried in corn flour if you want them to be crispy before putting them in the sauce. Even some also prefer deep frying the idlis
- Avoid tossing the idlis for long after putting them in the sauce as it may become soggy
- Make sure that the batter doesn’t get heated up while grinding to a paste
- The steaming period lasts between 12 and 15 minutes. Never over-steam idli since they will become thick and dry
- If you live in a hot climate, salt should be added after fermentation right before cooking idli
- Idli made with watery batter won’t rise and will be hard and flat. So make sure that the batter is not runny
- Give the batter some room to expand while it ferments. Do not overfill
Fermenting the batter overnight naturally can give you better results