About The Author

Hello! From Chuchura (in Hooghly District) and a foodie, I created this blog with a mission to preserve the food of the land; with a message to encourage and promote clean and real food. I hope you enjoy and gain out of this blog, happy reading!
Looking forward to read and hear your feedback.
I promise that this is the most detailed guide on the internet that will teach you how to master the Hyderabadi Chicken Dum Biryani recipe at home in simple, easy to follow steps with pictures.
This entire guide is divided into several parts to ensure that your first experience while making a Hyderabadi biryani is a complete experience. Whatever I have written here is based on years of experience in preparing the dish at home with the minimum kitchen set-up.
So hang on, and read through till the end.
Contents
- What makes a biryani tasty?
- What is meaning of dum in dum biryani?
- Day 0 Preparations
- Step by Step Hyderabadi Chicken Dum Biryani Recipe
- Pro Tips
- Why is Hyderabadi Biryani so famous?
What makes a Hyderabadi Chicken Dum Biryani tasty? What gives Biryani the flavor?
The qualities of a good biryani are –
- The aroma – Once you put the pot on dum, it should fill up your room with the awesome fragrance of rice, chicken and spices. And then when you open the lid to serve, a gush of the beautiful aroma wafts towards you and transports you to a magical world. The aroma can win half the battle
- Fluffy rice – Many restaurants in Hyderabad serve great biryani but the rice tends to stick. A fluffy, flavorful rice that does not stick is a major indication of a good biryani
- Fall off the bone chicken – Hyderabadi chicken dum biryani comes with big chunks of meat – be it chicken or mutton. Juicy chunks of meat, that fall off the bone when you try and take a bite is a major success criteria
- No bite on the whole spices – When there’s a beautiful biryani on the plate and you start digging in, you do not want to bite on the cardamom (elaichi) or cinnamon (dalchini) or the peppercorns. Whole spices have strong flavor and a bite is not a pleasant experience
- Delicious raita and salan – Personally speaking, I never need a raita or salan when the biryani is good. There is a saying – When in Rome, do as the Romans do. A thick, non-watery cucumber or onion raita accompanied with mirchi ka salan is what Hyderabadis prefer for a complete meal
I have considered all the above-mentioned factors to ensure that your Hyderabad chicken dum biryani recipe is a success.
What is the meaning of Dum in Hyderabadi Chicken Dum Biryani recipe?
Dum pukht or dum is a cooking process in which the ingredients are cooked in a sealed container. This ensures that the heat is trapped within the container, ensuring thorough cooking of the ingredients in it.
The method originated in Persia and means air cooked or baked. The Mughals brought it to India in the sixteenth century.
With dum biryani, the meat and rice is sealed using dough made of wheat to avoid heat from escaping. Alternatively, you can also cover the opening of the pot with a clean muslin cloth and then put a lid on it to ensure better results.
In hotels and restaurants that cook biryani for hundreds of their customers at a time, the chef ensures that the heat is trapped within by putting hot and burning charcoal on top of the lid to ensure that the pressure is maintained from both ends.
Day 0 – Preparation for Hyderabadi Chicken Dum Biryani Recipe
This is what you came here for, and this is where it all begins – preparation before the big day.
Which Rice is Required for the Dum Biryani Recipe?
I do not agree to chefs who say that you need the best quality rice for the best and authentic Hyderabadi chicken dum biryani recipe. You need not dig a hole in your pocket thinking that the most expensive rice will give you the best result.
The flavor of the biryani predominantly comes from the meat and the spices and how well you season the rice.
You can go to your neighborhood grocery store and get long grain biryani or Dehradun rice. The ones near my home charge me less than hundred rupees for a great quality product. Alternatively, you can always get it online.
India Gate’s Classic Basmati Rice (opens in Amazon) is a great buy and my preferred brand. You can also consider Kohinoor’s Super Silver Aged Basmati Rice (opens in Amazon).
How to Get your Chicken Cut? What Chicken Cuts to Order?
Always get your chicken freshly cut from the butcher. Walk down or drive to the nearest butcher and ask him for your choice of cut. Never rely on packaged stuff in India because of hygiene issues.
A good, fluffy, long-grain biryani rice is a dish half done without the right chicken cuts.
Follow these rules and your chicken cuts will be just perfect for your Hyderabad chicken dum biryani recipe.
- Get bigger pieces, not the usual curry cuts. If you are not comfortable with buying chicken, you can simply use the term “biryani cut” and your butcher will know immediately. I know my female friends who are very uncomfortable with getting chicken freshly butchered from the market, and this tip has always helped them. I assure you!
- Get leg pieces. Leg pieces are a bit more expensive but they are worth the money. Instead of getting expensive rice, invest on chicken leg pieces. A leg can be butchered into two or three pieces depending on how much the chicken weighs
- You can also ask for chicken breasts if you want more meat in your biryani. In Hyderabad, the norm is to cut a chicken into four pieces – two legs and two breasts. I prefer eight to ten pieces – in restaurants and hotels they have bigger ovens and bigger containers, while at home we have smaller containers
We are getting there, steadily!
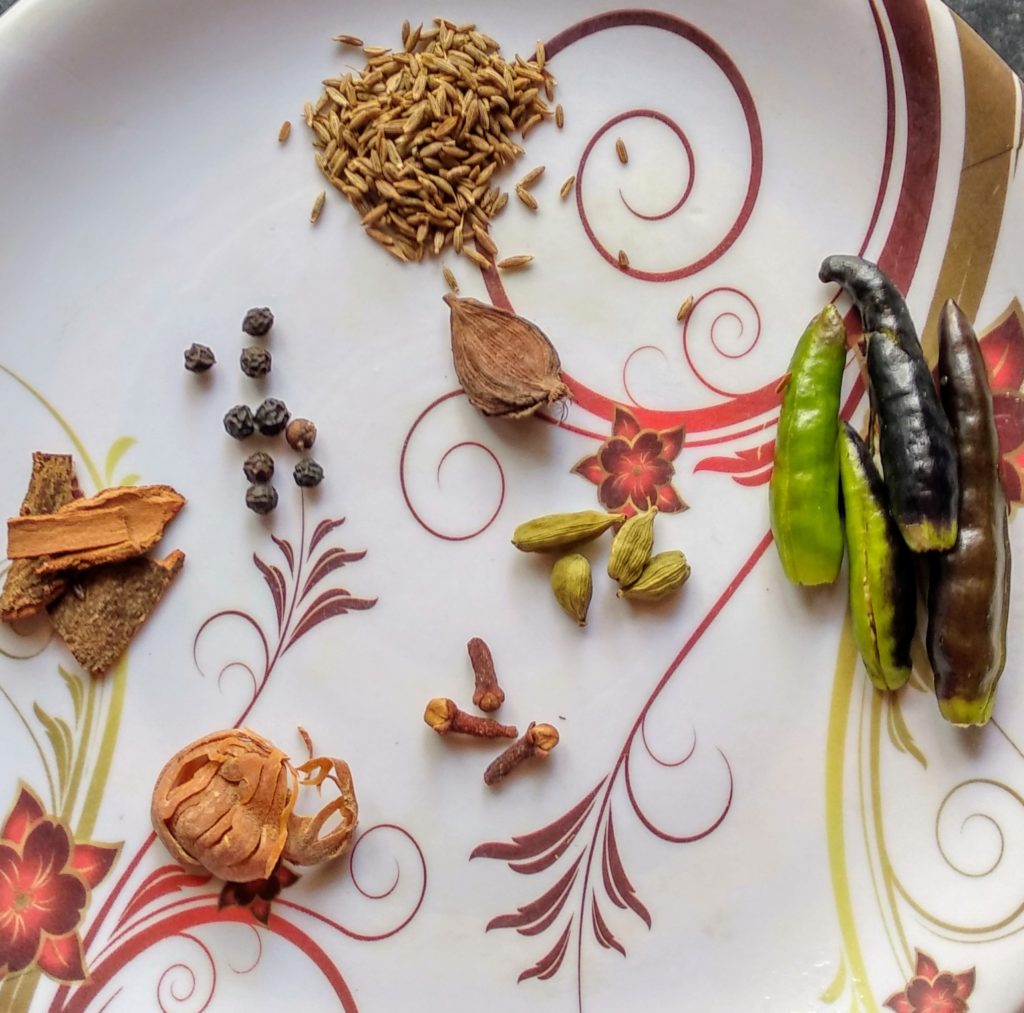
What Spices are Required for the Biryani?
No one likes a bite on the spices, but without them a Hyderabadi chicken dum biryani is as good as nothing.
As is the norm with Indian cooking, when cooking the biryani you would need two sets up spices.
Whole Spice
You will need whole spice to flavor the water while cooking the rice.
The important ingredients are bayleaf, pepper corns, shahi jeera (black cumin), cinnamon, cardamom, black cardamom, cloves. You will also need star anise, mace and nutmeg.
There are many more spice like stone flower, etc. that you can consider, but these are not mandatory.
Most of these spices are found in every Indian household.
If any of these are unavailable, you can get it from your neighborhood grocery store. You can simply ask for “whole biryani spice” and the shopkeeper will know. It will cost you fifteen to thirty rupees. Sufficient for a family of four!
On the internet, you can consider SFT Garam Masala Sabut (opens in Amazon) and get it home delivered.
If you are unable to get star anise and mace, you can skip. You biryani will be great without these as well!
Ground Biryani Spice
You will need ground spice mix to marinade the raw chicken and allow all the flavors to infuse for a minimum of 4-6 hours, preferably overnight.
You can either prepare it at home or get it store bought. I have never made it at home till date, and have always got it store bought.
I have tried different brands and Shan’s biryani masala wins the race. The one linked is a pack of 8 and hence you may not be inclined to get it, and I completely understand it. You might get it in one of the supermarkets or grocery stores near your home.
Alternatively, you can go for Ruchi, Everest, or Nawab’s biryani masala.
Biryani Pot – A Necessary Choice
The magic happens in the biryani pot and since the bottom receives direct heat, a thick-bottomed pot becomes a necessity. This ensures that the masala or spices do not get burnt.
At my native, I have a thick bottom pot or well-built casserole like this 5 liter pot (opens in Amazon). However, mostly I cook it in a 5-liter capacity Prestige Pressure Cooker when I am at Bhubaneswar (this is where I work).
If you have a thick-bottomed vessel with sufficient capacity, you are well on your way to cook a delicious pot of Hyderabadi dum biryani.
Should You Use Oil or Ghee for Preparing Biryani?
The common perception is biryani needs a lot of ghee. It’s a myth that many chefs debunk. What ghee does is create a coating on the rice making the rice smell of ghee rather than the flavor from meat and spices.
Always use a combination of oil and ghee.
Use oil while marinading the chicken and cooking the rice. You can use any oil that you have in your pantry, while most people prefer refined oil.
I am not a fan of refined oil and prefer using mustard oil and it does not impact the flavor in any way. If you are wondering why I am not a fan of refined oil, you can read my guide on the best oils for Indian cooking.
You will use ghee to only brush the bottom of the biryani pot. You will also need ghee before you close the biryani pot and put it on dum.
What Ingredients are Required to Make a Chicken Biryani?
For a serving of four, you will need the following ingredients for a Hyderabadi chicken dum biryani recipe:
- 1 kilograms of chicken on the bone cut in bigger sizes
- 600 grams of Basmati Rice
- Whole spices
- 4 pieces of cardamom
- 2 pieces of bayleaf
- 2 sticks of cinnamon
- 6 pieces of cloves
- 8 to 10 pieces of peppercorn
- 1 piece of star anise
- 1 piece of mace
- half a piece of nutmeg
- 30 grams of store bought biryani masala
- 1 teaspoon of turmeric powder
- 200 grams of curd
- 4 pieces of onions sliced
- 2 inch of ginger
- 10 to 12 pods of garlic
- 5 pieces of green chilies
- 1 cup of coriander leaves
- 1 cup of mint leaves
- Salt to taste
- 2 tablespoons of ghee
- 6 tablespoons of Oil, two tbsp each for marinading, frying onions and cooking the rice
- One half tablespoon of rose water
- One half tablespoon of kewra water
- Half a cup of milk – this is optional
- Few strands of saffron – this is optional
You can add milk and saffron, or happily skip it like I do most of the times to keep the cost low. Poor me!
Step By Step Hyderabadi Chicken Dum Biryani Recipe
Here’s a step by step description of what you will do for one of the most amazing dishes of India.
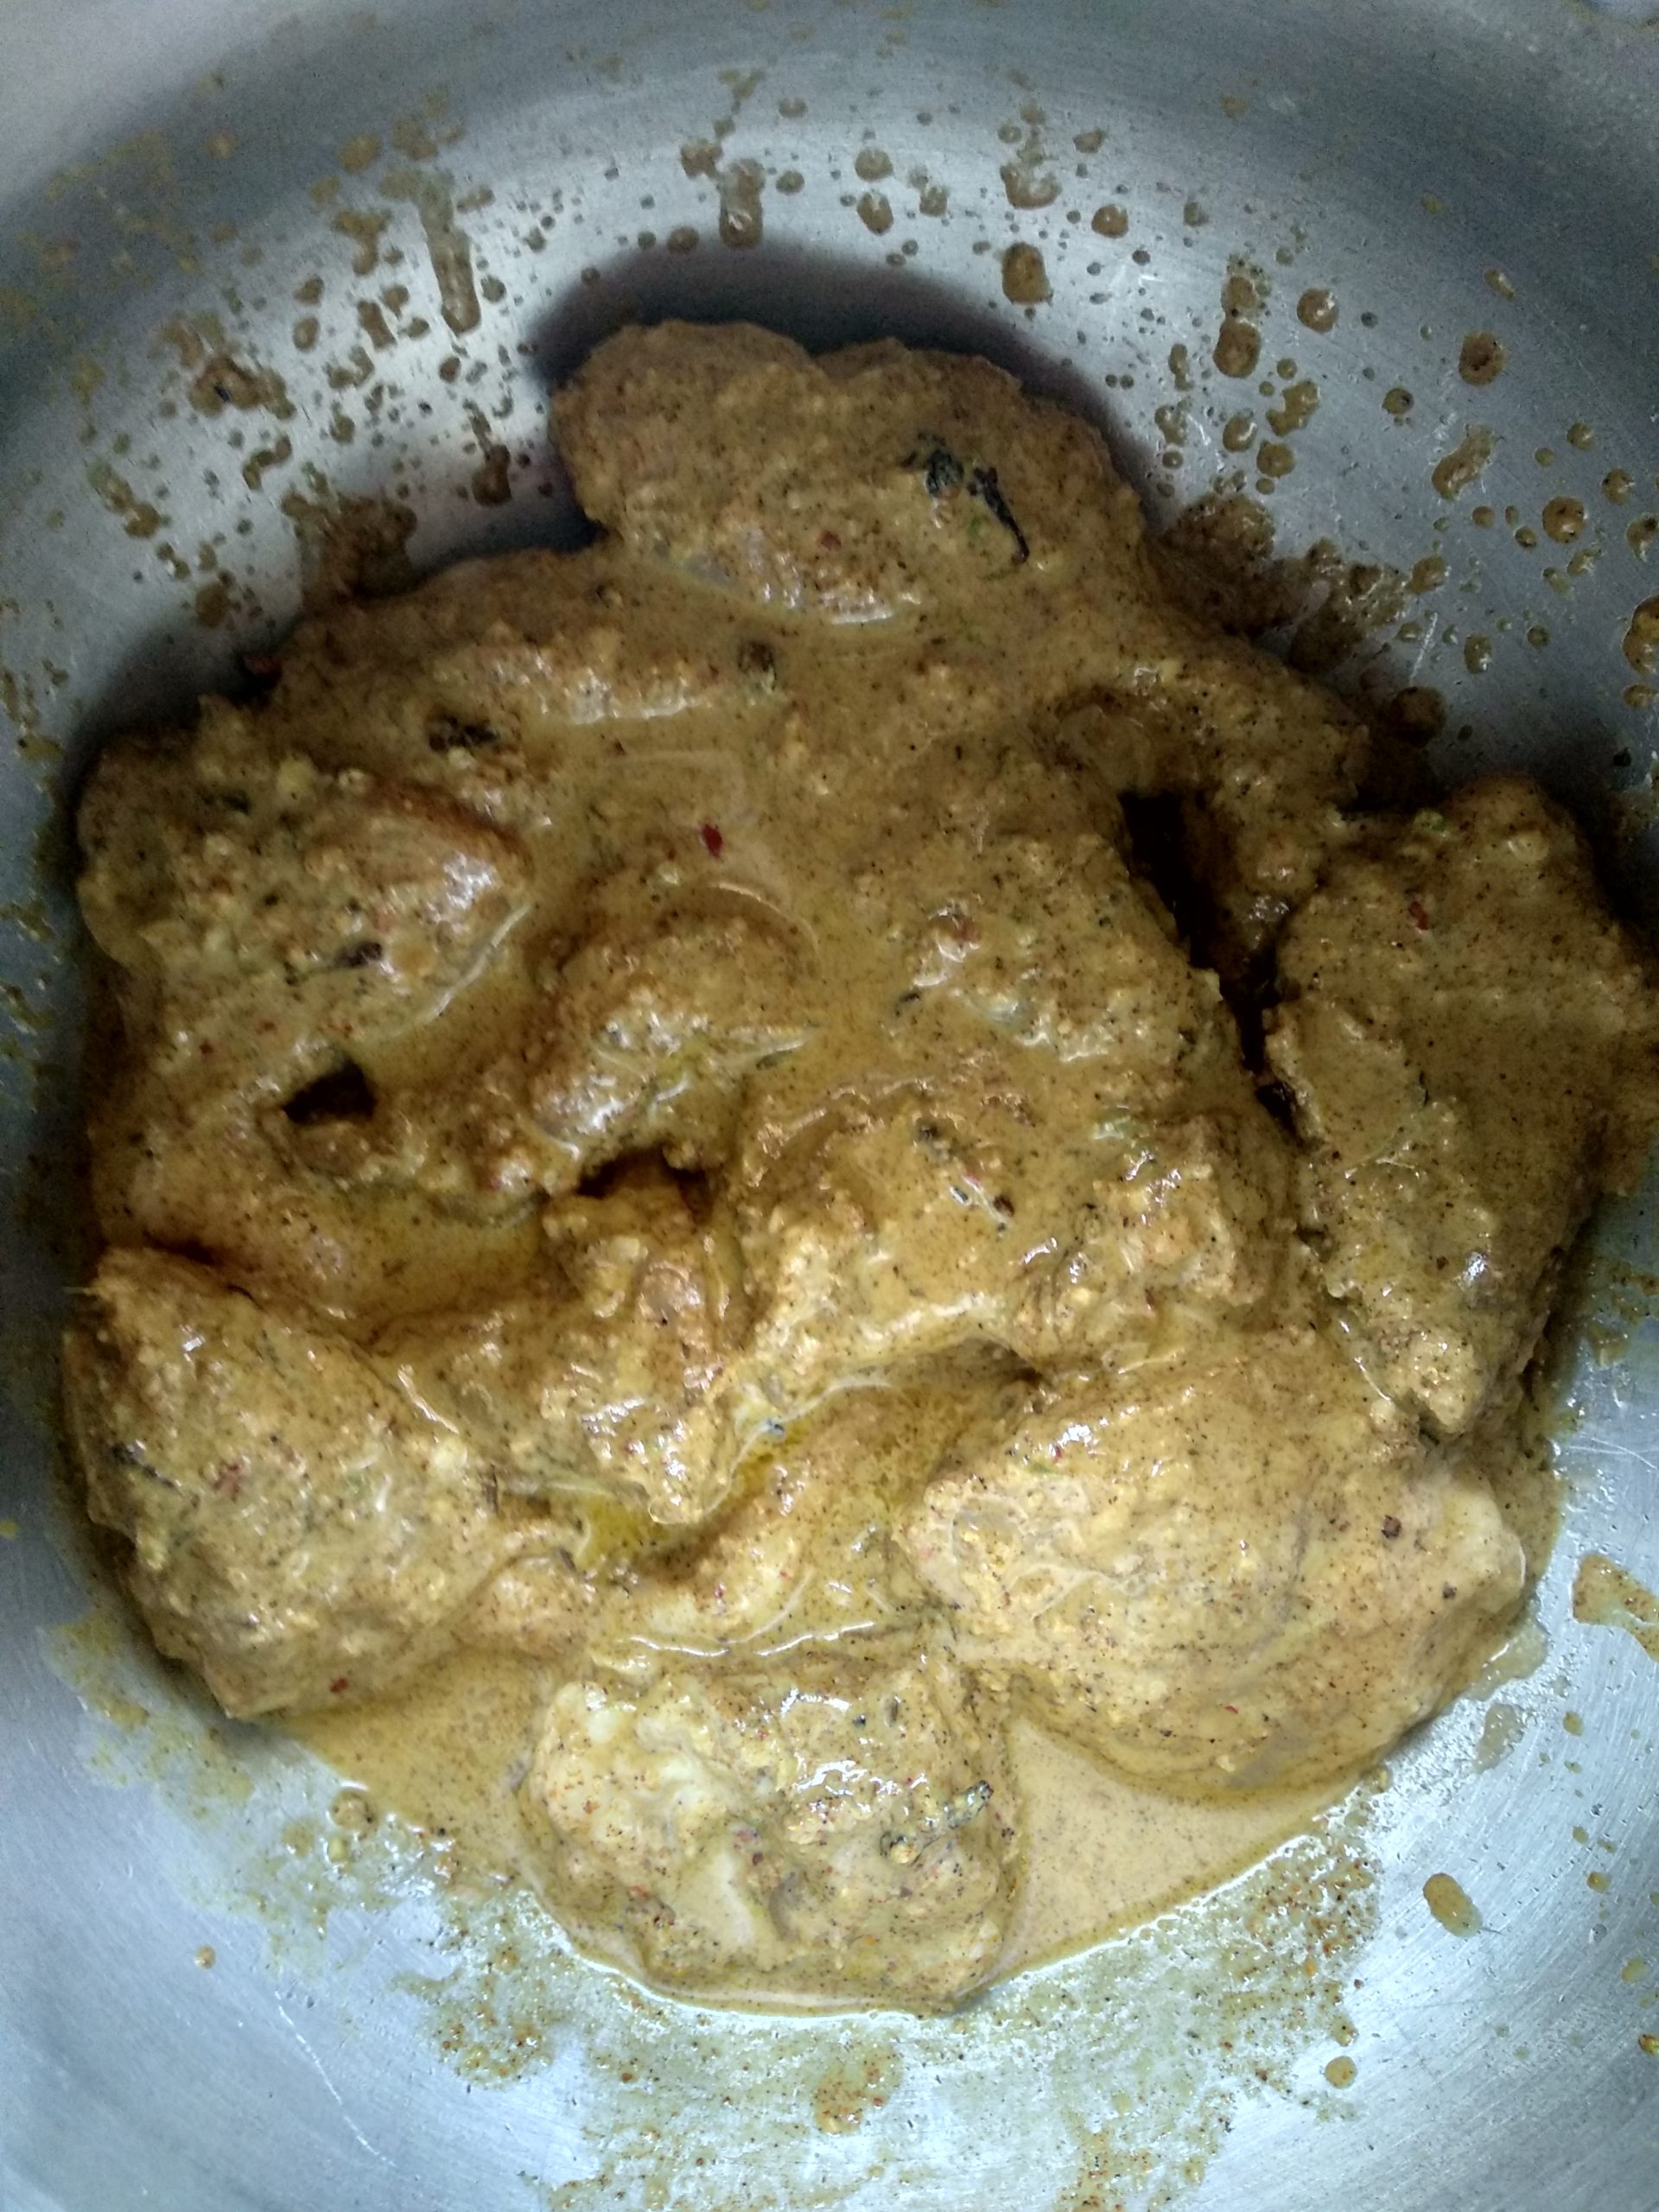
Step 1: The Night Before – How to Marinade the Chicken for Your Biryani?
You get the chicken from the neighborhood butcher and wash it thoroughly. Let it rest for 15-20 minutes to let the water drain off the chicken.
Chop ginger, garlic and two chillies and make a paste using a mortar pestle or mixer-grinder.
Whisk the curd properly to ensure a smooth creamy texture. You can use a mixer-grinder for this purpose and it gets the job done in a jiffy.
Take a bowl and prepare a marinade of the following:
- Whisked Curd
- Ginger, garlic and green chilly paste
- Biryani masala
- Turmeric powder
- Oil
- Salt to taste
Be sure of the amount of salt you use. Remember that your store-bought biryani masala contains a good amount of salt in it.
This is what I do – I use my index finger to scoop very little of the marinade and put it at the tip of my tongue. I get an understanding if the salt is right or more is needed. I then spit the masala out and rinse my mouth for a few seconds.
Ensure that your marinade is properly mixed and uniform.
Pour this marinade over the chicken and massage for a couple of minutes. Make sure that the marinade rubs every part of the chicken.
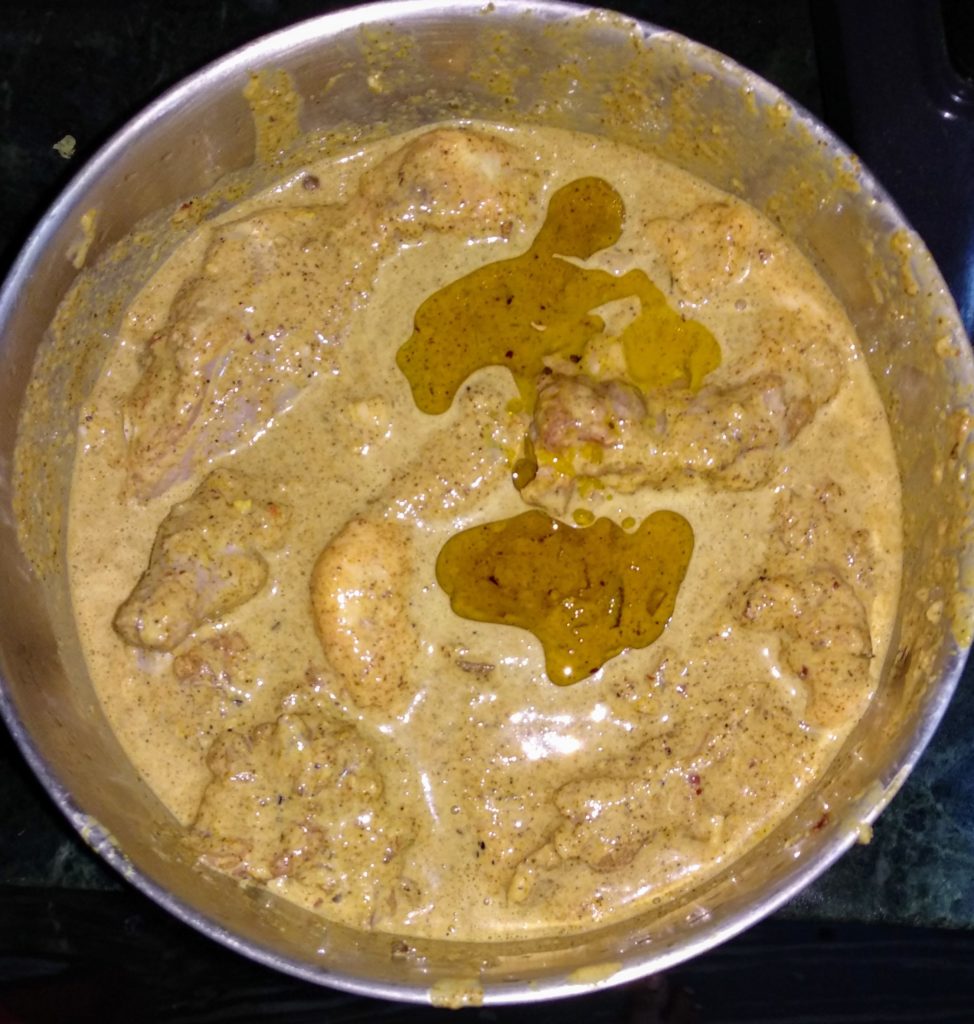
Cover the container with a heavy lid and put it into the freezer.
A minimum of 4 to 6 hours of marination is required. I prefer overnight and it also ensures that my lunch is cooked in time.
If you plan to cook the authentic Hyderabadi chicken dum biryani recipe at dinner, you can always marinade and put it in the freezer in the morning or by lunch.
Step 2: Next Day – Pull Out the Chicken from the Freezer
Before you plan to cook the biryani, you need to take out the marinaded chicken from the freezer at least an hour back to let it thaw and return to room temperature.
This rule does not just apply to biryanis. Never cook meat directly out of the freezer. It is not a healthy practice. Always let it thaw.
I have found marinating the chicken for 3-4 hours works good too. This helps you cook a biryani on the same day, and does not require overnight marinate. The steps are the same.
Step 3: Soak the Rice in Ample Water
Take a bowl big enough where you can soak the rice.
Wash the rice a couple of times and be gentle while scrubbing the grains clean. Don’t scrub them hard, it might break the rice grains.
Place the washed rice in the bowl/container and cover it with enough water. As a rule of thumb, ensure that the level of water is at least an inch above the rice.
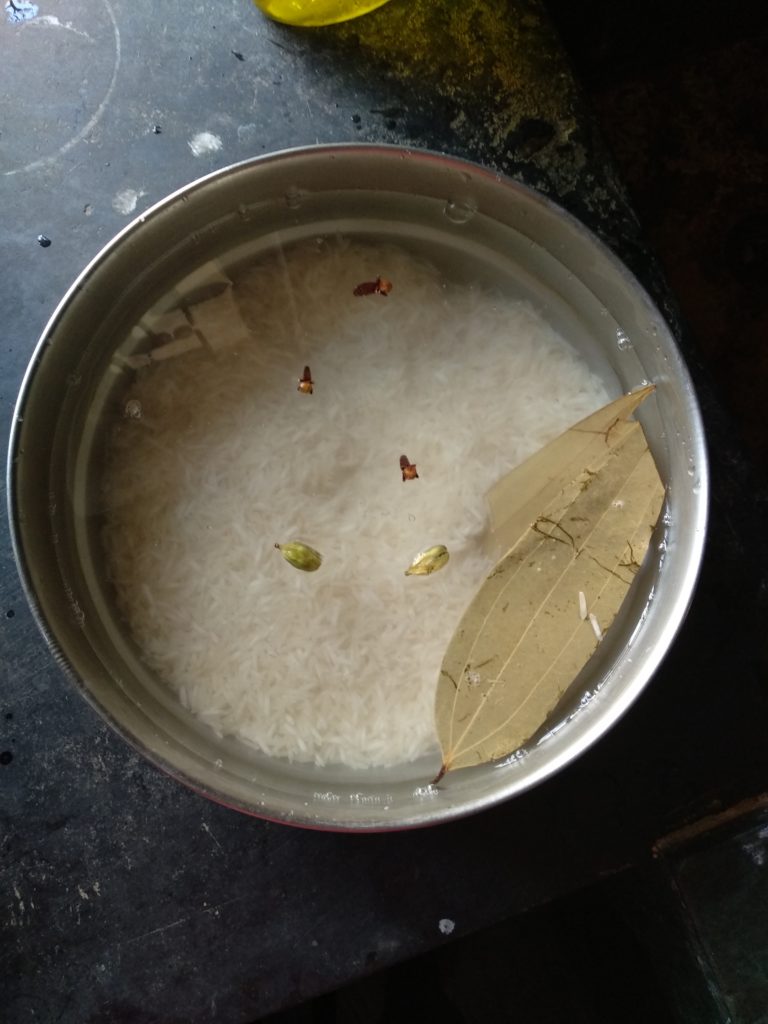
When you add enough water to the rice, you get longer grains of rice.
You will need to soak the rice for a minimum of 30 minutes, but not more than 1 hour.
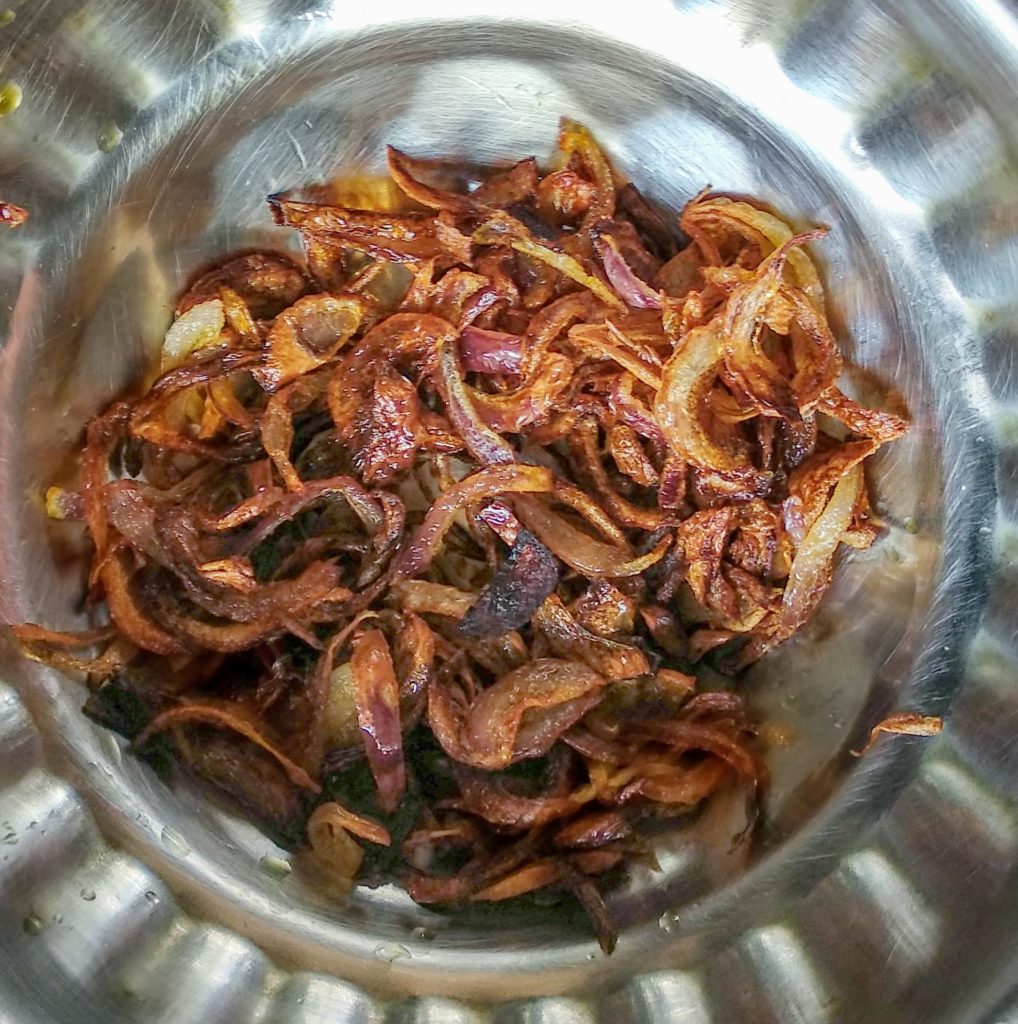
Step 4: Fry the Onions till Golden Grown
Take medium sized onions and slice them finely with a sharp knife.
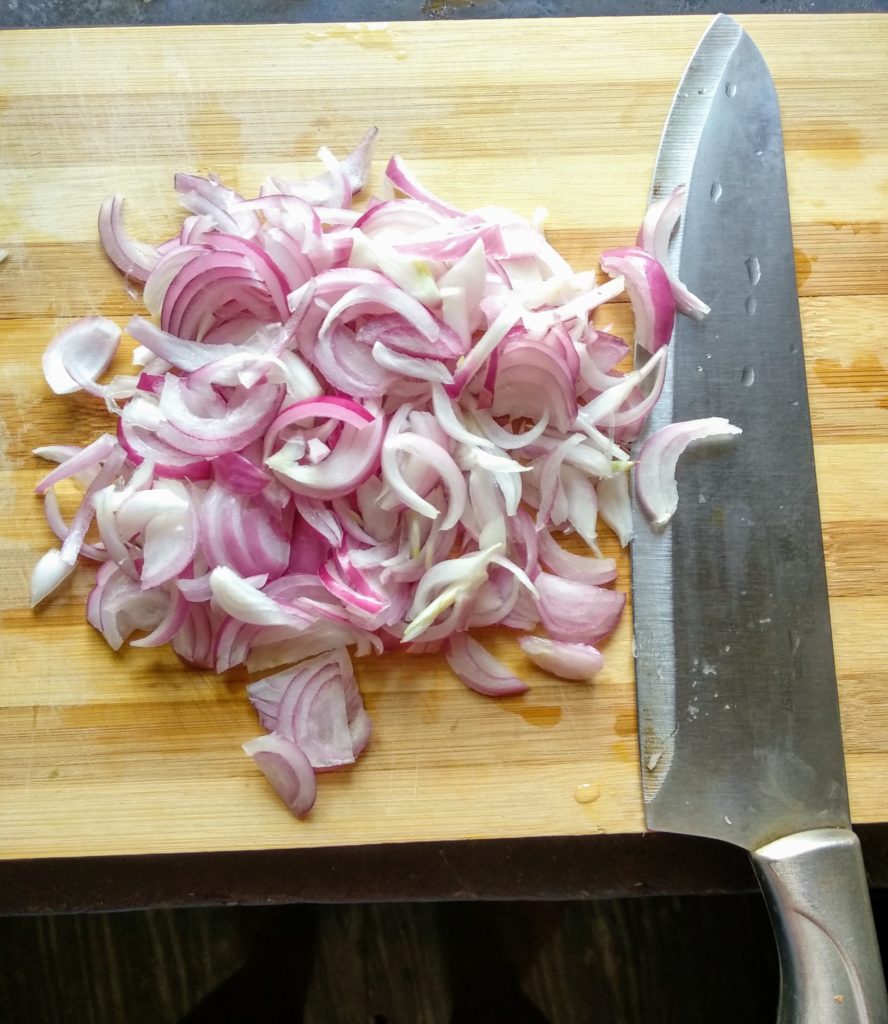
Take a wok/kadai, add oil in it.
When the oil is hot, throw in the onions gently and fry till golden brown.
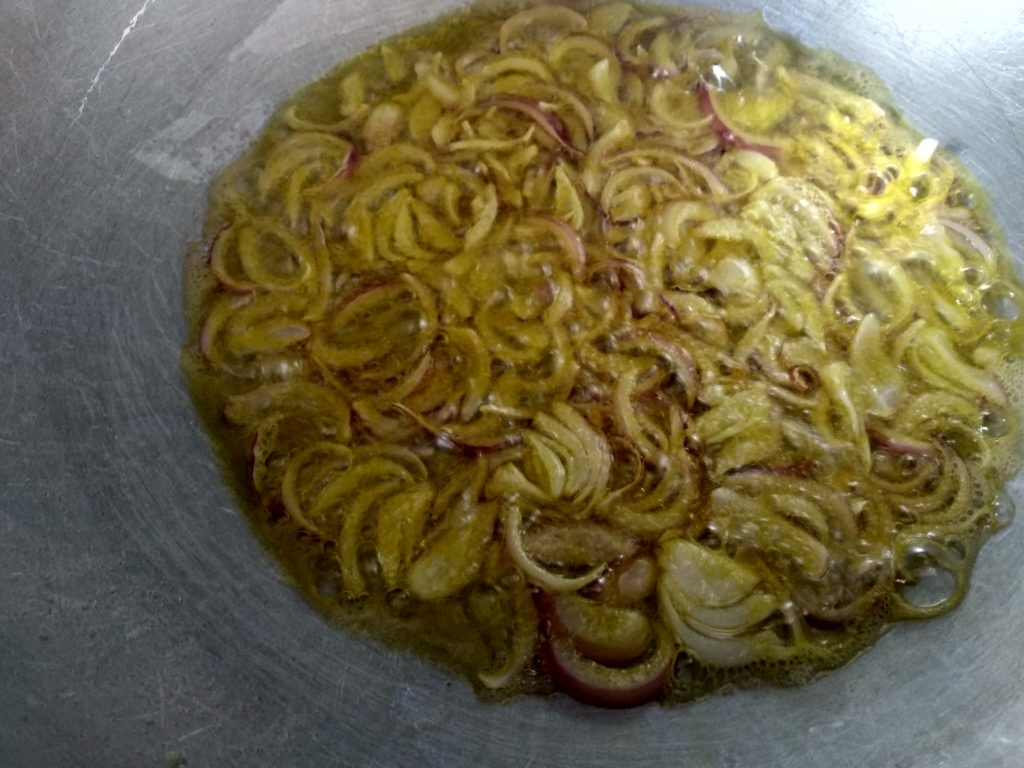
At this point, remember that you should not fry the onions till it reaches the dark brown color. As onions will continue to cook when you take off the flame, the timing is important to prevent burning of onions.
Of course, you do not want your fried onions to turn black and ruin your Hyderabadi chicken biryani with a burnt smell.
Again, as a rule of thumb, take the fried onions off the flame and let them cool in a container/dish when you see the onions have gained lighter brown color.
After a couple of minutes, you will see onions have dark color.
If you have a relatively smaller kadai, do not fry all your onions at one go since it will prevent even browning of the onions. I always brown my onions in batches when I cook dum biryani.
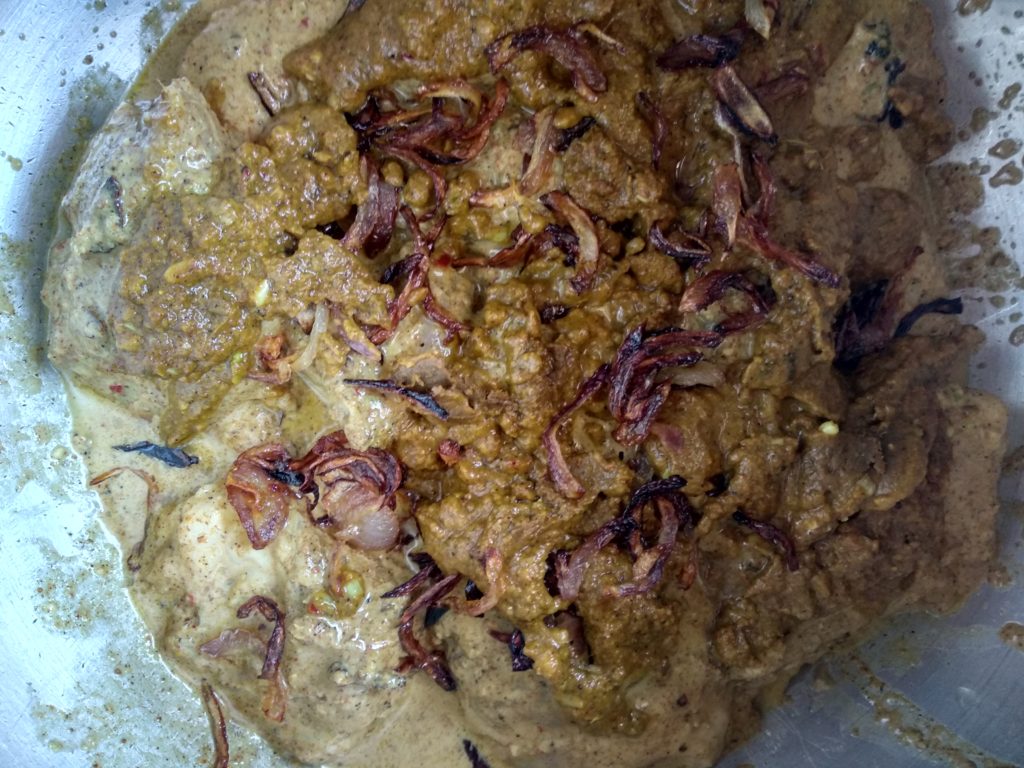
Step 5: Layer the Chicken in Biryani Pot
Take your biryani pot, and brush the bottom of the pot with ghee. Add the chicken to it. Marinaded chicken form the bottom-most layer.
Make sure that the chicken should cover the pot and part of every chicken touches the bottom of the pot. The final result is a char which gives a smokiness to your biryani.
Add in half of the brown onions and coriander and mint leaves at this point. I like my biryani without coriander and mint leaves and hence have not added it.
Step 6: Season the water and cook the rice till 70% done
The goal here is to ensure that you do not overcook the rice.
In dum cooking, you cook the rice till it is 70% done. The rest is cooked in the dum style.
Another important aspect of cooking the rice is to ensure the right amount of seasoning. Much of the flavor that the rice acquires is from the salt added while you cook it.
Take a pot and fill it with water. Add salt, oil, green chilies and the whole spices mentioned in the ingredients above. You add oil to ensure that the rice do not stick and that each grain is separate.
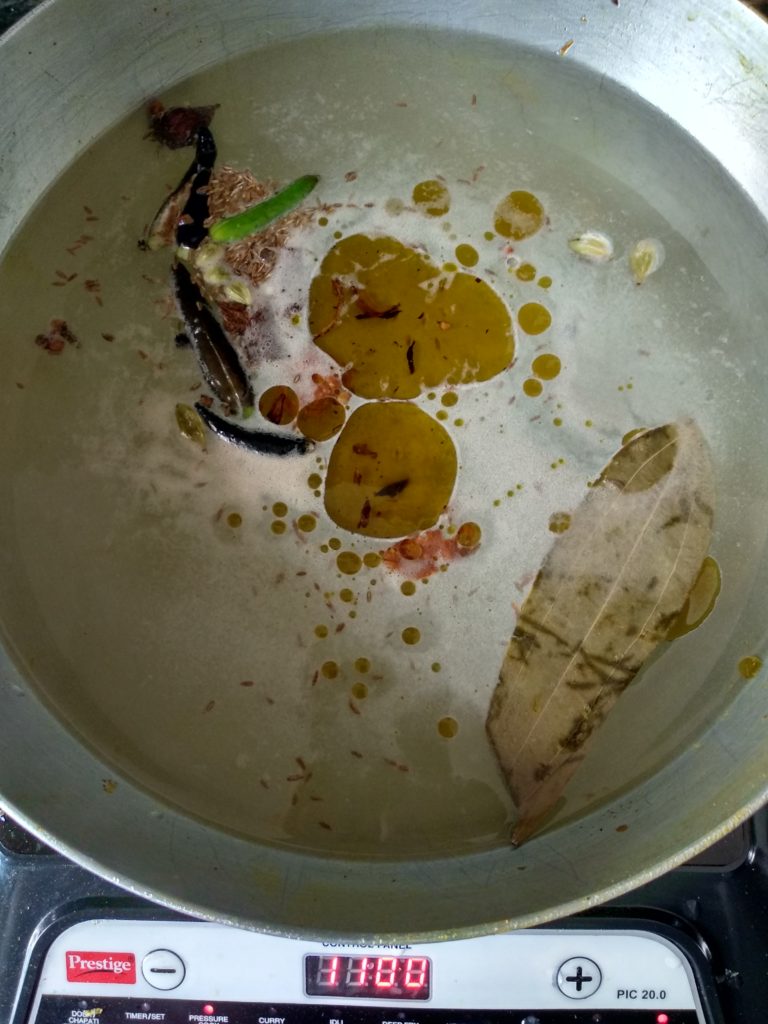
Allow the water to come to a rolling boil.
Take a spoon and taste the water. Does it taste salty? If yes, you are fine. If no, add more salt. The main goal here is to ensure that water tastes like sea water.
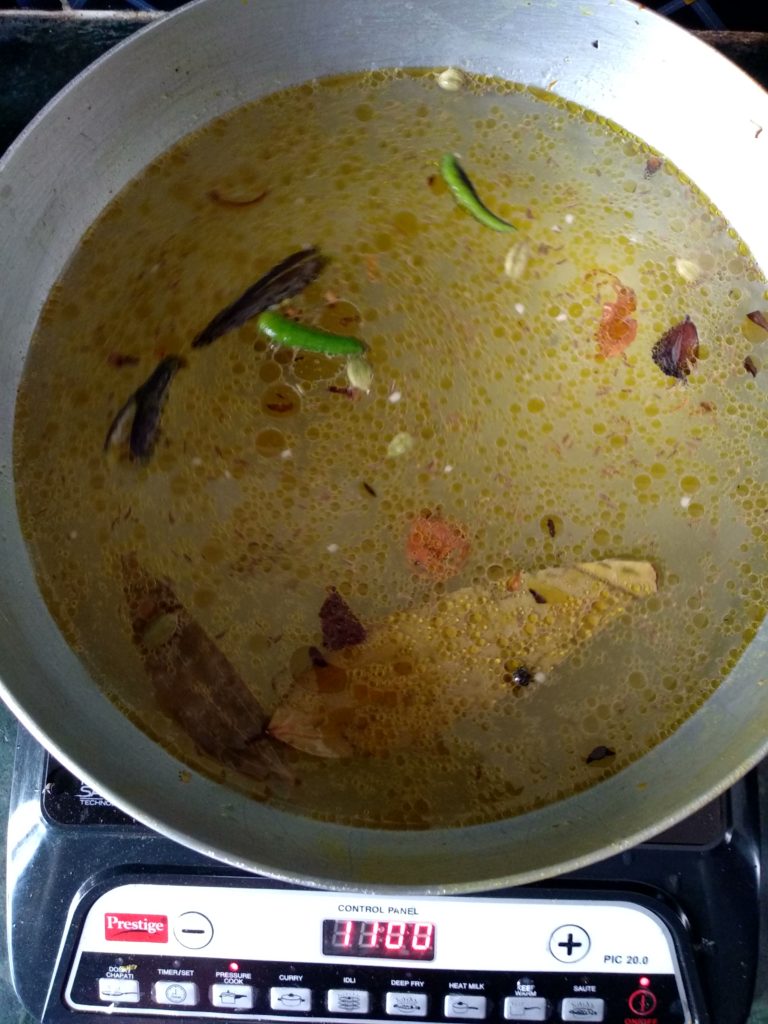
Once the water is seasoned properly, give it a nice stir add in the rice.
It will take close to 5 minutes for the rice to get 70% cooked.
The rule of the game is to take a grain or two of rice. See if it breaks up in two or three with some pressure. This is when you will know that the rice is 70% cooked.
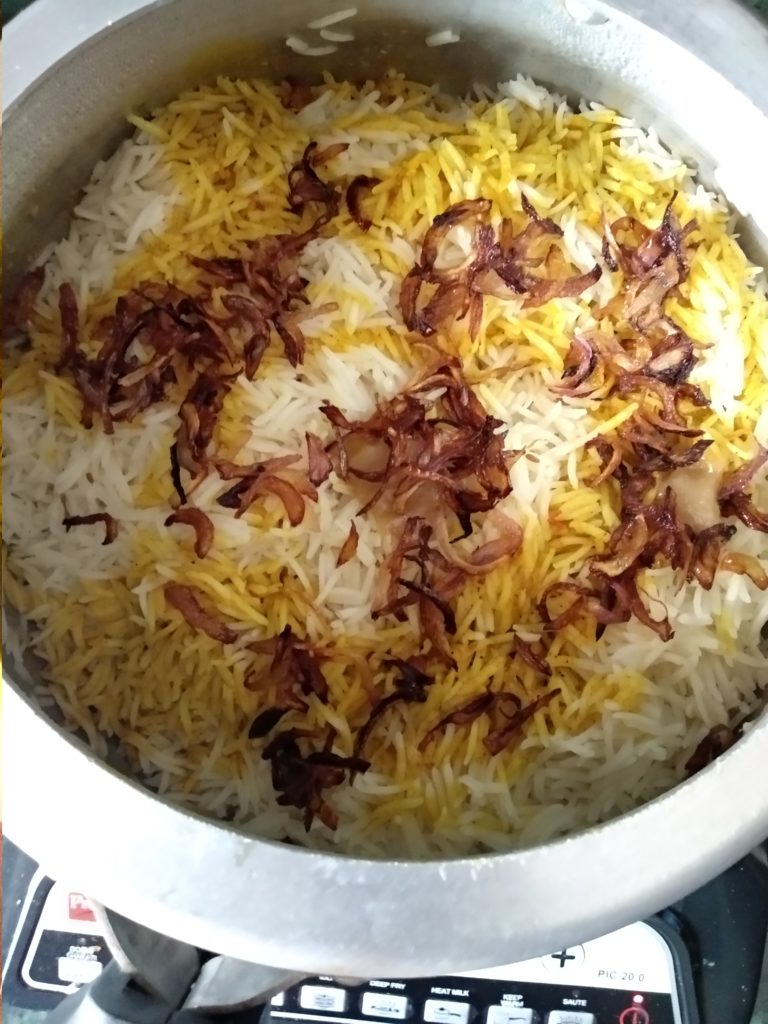
Step 6: Layer the Rice and Chicken
This is where you will need to speed up. You have the biryani pot ready with the chicken resting at the bottom of it.
The rice is being rapidly cooked and a delay will overcook it and make it mushy.
Your job is to take the rice from the pot it was cooking in and gently toss it over the marinaded chicken in your biryani pot.
Take a perforated ladle – cooking spoons that have holes in them! This will allow the water to drain off when you transfer the rice to the biryani pot.
Once you have layered half of the rice, throw in some brown onions and layer it with the remaining rice.
Add the ghee on the top.
Throw in the coriander and mint leaves.
If you have milk and saffron strands, mix both in a bowl and pour it over the pot in a circular motion.
Finally, add the brown onions and pour over a few drops of rose water and kewra water.
Close the lid.
The idea is to ensure that no air from inside the pot escapes. So you have to ensure that the lid you are using fits properly.
You can add a weight on top of the lid, or close any opening with the dough as is the norm traditionally.
Step 7: Put the Pot on Dum
The last step of your Hyderabadi chicken dum biryani recipe. You have done everything properly till now.
Once you close the lid and put it on the flame, there is little that you can do. Your biryani is inside but you do not know how the heat is affecting it.
Don’t worry, I have got you covered.
For the first ten minutes, put the biryani on a high flame. Then for the next twenty five minutes, put it on a low flame.
You will find slowly and gradually that the entire kitchen smells of the biryani and the aroma infuses into your living and dining rooms.
Put off the flame after twenty-five minutes.
Do not take off the lid immediately. Let the Hyderabad chicken dum biryani rest for sometime. Say 10-15 minutes.
Only then you can proceed to unravel your biryani.
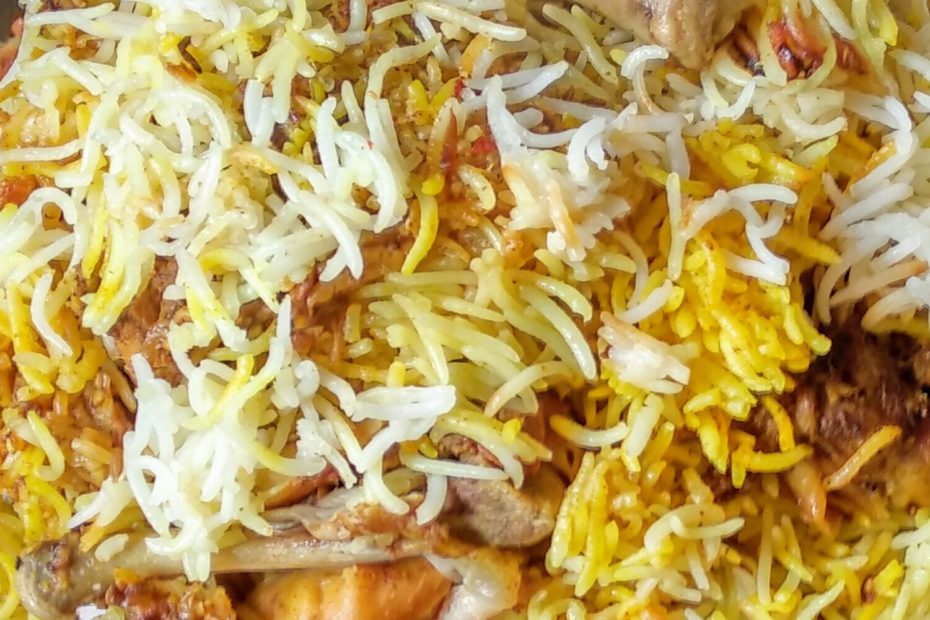
What hits your nose once you open the lid is best term as magic, magnificence and awesomeness!
Step 8: Serve hot
Serving the biryani is a technique in itself. Do not dig up the biryani from the middle of the pot with your serving spoon.
Wait! Scoop the biryani very carefully from the sides of the biryani pot. This ensures that the chicken pieces and the masala are properly mixed with the rice.
Digging the rice and chicken from the middle of the pot will result in the long, fine rice grains breaking which is an undesirable experience.
What is Served with Hyderabadi biryani?
Hyderabad dum biryanis are traditionally served with a boiled egg, raita and mirchi ka salan.
Raita tastes good when it is consistent and not very thick or very thin. You can have onion and cucumber to prepare your raita and top it with some black salt and roasted cumin powder.
Do share your experience with me on how this Hyderabadi chicken dum biryani recipe turn out for you. You can share this with me over email or tag me on Instagram and Facebook. If there’s anything missing from the details, please let me know and I shall add it to this post with credits to you.

Note
The equipment & ingredient quantity provided in this recipe is to assist you in cooking this dish. Feel free to experiment with your ingredients. Remember that we all have different set, size & shape of kitchen tools in our pantry.
Equipment
- Pressure cooker or cooking pot to dum the biryani
- Pot to cook the rice
- Wok/Kadai to fry onions
- Bowl big enough to prepare the marinade and marinade the chicken overnight
- Ladles
- Serving Plates
Ingredients
For Cooking the Rice
- 600 gram basmati rice India Gate
- 4 pieces cardamom
- 2 pieces bayleaf
- 2 pieces cinnamon
- 6 pieces cloves
- 8 pieces peppercorn
- 1 piece star anise
- 1 piece mace
- 0.5 piece nutmeg
- 1 tbsp oil
- salt
Marinating the Chicken
- 1 kg chicken on the bone, bigger sizes than normal curry cuts
- 1 tbsp oil
- 1 tsp turmeric powder
- 30 grams biryani masala store bought
- 200 grams curd should be well beaten for consistency
- 2 inch ginger
- 10 pods garlic
- 5 pieces green chillies
- 1 cup coriander leaves chopped, small cup
- 1 cup mint leaves chopped, small cup
For the Dum
- 4 pieces onions medium sizes
- 4 tbsp oil to be used for frying onions or preparing brown onions
- 2 tbsp ghee desi cow ghee is preferred
- 0.5 tbsp rose water
- 0.5 tbsp kewra water
- 1 cup milk optional, small cup
- 10 strands saffron or optionally a pinch of food color
Instructions
Wash and Marinade the Chicken
- Wash the chicken and let the water drain out
- Prepare a paste of ginger, garlic, green chillies
- Take a bowl and prepare a marinade with the ginger, garlic, green chilly paste prepared in the previous step, curd, turmeric powder, salt, biryani masala, and oil
- Ensure that the marinade is consistent and there is no lump
- Pour the marinade over the chicken pieces and massage properly to ensure that marinade is evenly spread.
- Cover and refrigerate overnight or a minimum of 4 hours
Pull out the marinaded chicken from the refrigerator and let it thaw for an hour
Take rice, wash and keep it soaked for minimum 30 minutes and maximum 45 minutes
Prepare the Brown Onions
- Thinly slice the onions
- In a wok or kadai, pour oil and once the oil is hot, drop the onions
- Fry till the onion is golden brown
- Keep aside in a bowl
Cook the Rice till 70% Done
- In a pot, add water along with all the whole spices, oil and salt and allow the water to come to a boil
- Once the water boils, check if the water is salty. If not, add more salt to ensure that the water is seasoned properly. It should taste like sea water
- Drain and add the rice. Keep a careful eye as the rice cooks faster
- Drain the rice and keep aside once it is 70% cooked
Layering the Rice and Chicken and Preparing for Dum
- In a biryani pot, brush some ghee at the bottom. You may use oil as well
- Add the marinaded chicken and ensure that part of every chicken piece touches the bottom of the pot
- Add some brown onions, chopped coriander and mint leaves on top
- Carefully toss half of the rice on top of this
- Repeat by adding some brown onions, chopped coriander and mint leaves
- Toss rest of the rice
- Add the remaining brown onions, chopped coriander and mint leaves
- Soak the saffron strands in milk and pour over the biryani
- Add ghee, rose water and kewra water
- Close the lid and seal the pot
- Cook on high for 10 minutes
- Cook on low flame for around 20 minutes
- Switch off the flame
Allow to Rest and Serve Hot
- Allow the covered pot to rest for another 10 to 15 minutes
- Carefully lift the lid and serve hot with raita and salad
Notes
- Tomatoes are not used in Hyderabadi dum biryani
- Chicken is never cooked and then layered in Hyderabadi biryani
- Brown onions, coriander and mint leaves are an integral part of the recipe
Pro Tips for Hyderabad Chicken Dum Biryani Recipe
You may follow the steps below to help your biryani stand out.
- For best results, always marinade the chicken overnight
- If you prefer a spicy biryani, you can increase the amount of green chillies and grind them to a paste
- The oil left in the wok after you have fried the onions are flavorful. Do not discard it. Add this oil to the water for cooking the rice
- Grease the bottom of the biyani pot with ghee before placing the chicken in the biryani pot. This acts as a lubricant and avoids the burn
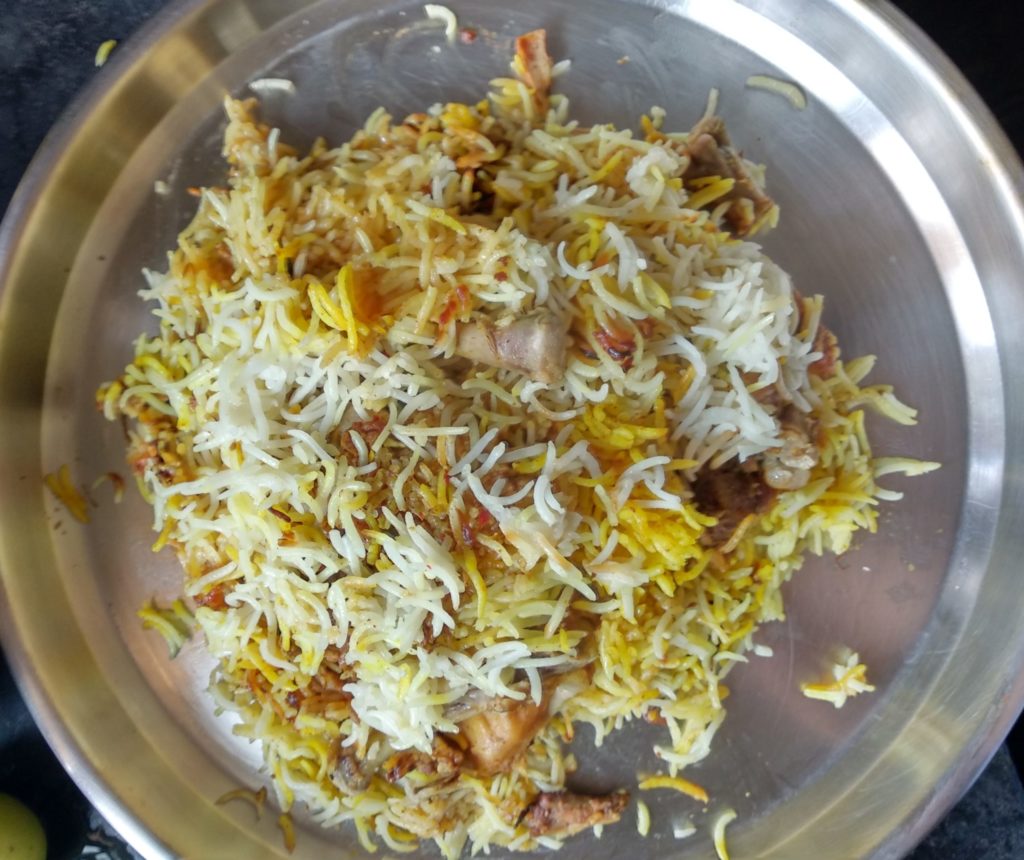
- When transferring the chicken to the biryani pot, add only half the marinade. But do not discard the rest. Cook it with a pinch of turmeric and add half of it each to the following –
- on top of the chicken and brown onions (check the image above)
- on top of the rice before closing the lid – you can make this lighter by adding some water. This can very well replace the saffron and milk if you want to keep the costs down.
- You can also replace the saffron strands and milk by taking some oil in a wok and add half a teaspoon of turmeric to it. Once it starts to sizzle, pour it all over the rice. It gives a golden color to the rice.
- Many do not like the smell of rose and kewra water in their biryani. You can always avoid it
- If you do not have a good biryani pot, you can always do it in a pressure cooker. The images you see on this article are a result of the biryani as cooked in a pressure cooker. Trust me, you can get wonderful results.
Why is Hyderabadi Biryani so Famous?
“Biryani” and “Hyderabad” are synonymous not just in India but outside too.
What makes biryani in Hyderabad so famous? Here are a few reasons:
Perfect Flavors and Word of Mouth
Hyderabadi Biryani is not very aromatic. It does not fill your room with a lot of aroma. Best described, the aroma is subtle and helps you concentrate on the meaty flavors of the biryani.
Hyderabadi chicken dum biryani perfectly captures the meaty flavors in the rice and that is what makes it so special for the ardent admirers it has earned over the decades.
Massive Consumption
In the late twentieth century, this was a royal dish available for special occasions by the economically well off section of the society.
Hyderabad changed that. As the city expanded, the biryani from the region became a household name thanks to the massive consumption of the dish in the city.
The population in Hyderabad eats more biryani a day than any other city in the world. Paradise is a restaurant that served more than 70 lakh biryanis in 2017 and recorded its name in the Limca Book of Records.
Bawarchi sells a daily average of 2000 plates of biryani through orders over Zomato only.
Quantity
Not to forget the huge amount of rice and big chunks of meat that is served in all restaurants of the city which make it a delicious, considerably cheaper and stomach-full experience for people who come to the city from all corners of the world.
Have you ever been able to complete a plate of Hyderabadi chicken dum biryani? I have never succeeded till date, the amount is huge.
Kachhi style of cooking for Hyderabadi chicken dum biryani
Hyderabadi style of cooking biryani perfects the kachhi style of cooking.
While the other varieties of Biryani cook the rice and meat separately and then cook both in layers, Hyderabadi biryani cooks raw meat with cooked rice in dum.
Kacchi style is difficult and I have tried to share all these details in this article to help you cook a perfect pot of biryani in your kitchen.
Pakki style is more prevalent across the country and Awadhi or Lucknow biryani and Kolkata chicken biryani are the best examples.
However, the Hyderabadi biryani has failed to get a GI tag. In 2009, the biryani association in Hyderabad applied for a GI tag. This was denied in 2017 because of technical reasons – like proof for historical origin and data was not provided to the GI registrant’s satisfaction.
It might have failed to get a GI tag, but there is no doubt that Hyderabadi biryani rules our hearts.
The entire writeup is really great, with the coverage of entire details…kudos to you. What’s your take in cooking it in a handi (earthen pot)? How would one cook it in a handi? Any tips?
TIA
Hello, Biryani can be cooked in an earthen pot. The process is the same – honestly I have never tried it. It should take lesser amount for the dum, because it cooks pretty fast in an earthen pot.
Hi Mr. Chowdhury,
Appreciate the prompt response. Thanks a lot. Will try it in pot today, handi maybe some other time.
This post is extremely radiant. I extremely like this post. It is outstanding amongst other posts that I’ve read in quite a while. Much obliged for this better than average post. I truly value it!
Thanks For Sharing this amazing recipe. My family loved it. I will be sharing this recipe with my friends. Hope the will like it.
Pingback: Chicken Yakhni Pulao Using Bengali Gobindobhog Rice - FinallyFoodie.com
Pingback: Kolkata Style Chicken Biryani in Pressure Cooker
Pingback: Gobindobhog Biryani - Introducing the Novel Bengali Biryani - FinallyFoodie.com
Pingback: Dada Biryani Bhubaneswar - Should You Go There?
Ya nice. Plz put new uttarakhandi recepies too